
Christmas Tree Runner Tutorial
This post may contain affiliate links which won’t change your price but will share a commission.Are you thinking about the holidays and wishing you had a beautiful quilted table runner?
Well, keep reading as I have a fast & easy Christmas Tree Runner tutorial to share with you!
This Christmas tree table runner could easily be made before the holidays and can go along with the little mini Christmas tree mug rug that I showed yesterday.
Christmas Tree Runner Tutorial
10″ x 38″

The table runner is made using 2½-inch strips of fabric and then sub-cutting them to the right size.
Fabrics needed:
- 4 Fat Quarters – different greens for the Christmas trees or 1/8 of a yard of 4 different greens for the 2½-inch strips
- 3 – Scraps of brown fabric at least 2½-inch square each
- 1½ yards cream for background and backing
- 1/3 yard stripe fabric for blocks and binding
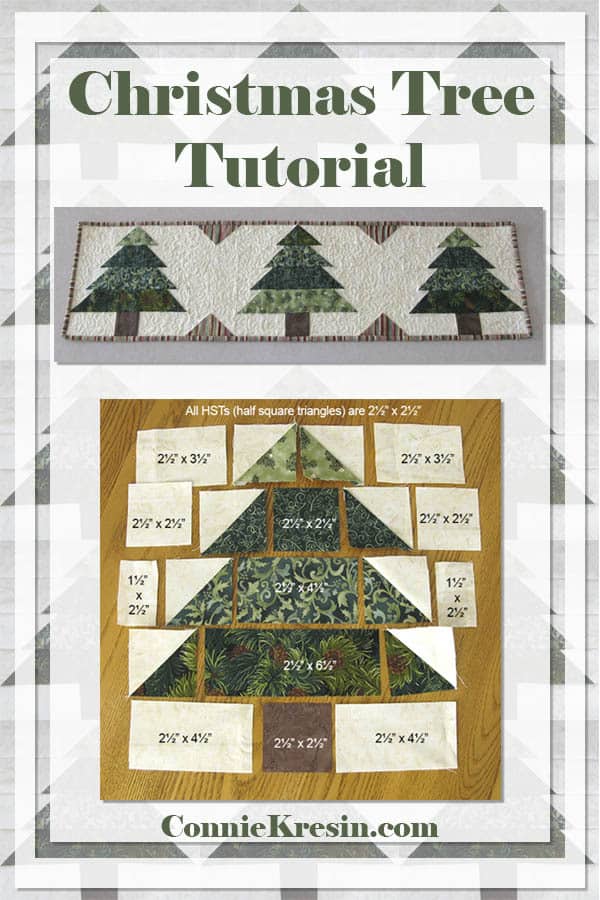
Here is the layout of each block, can you tell I am a visual person?

I used 4 different prints for each tree.
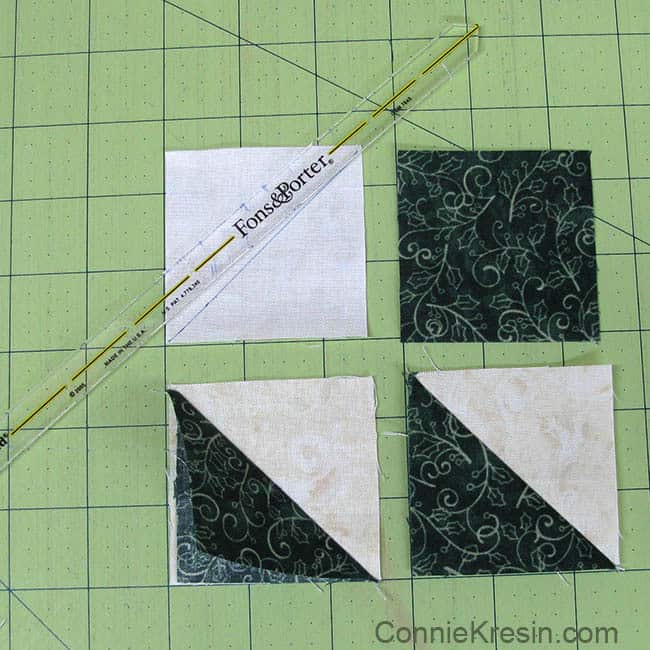
You are going to make easy half-square triangles by cutting your background fabric and tree fabric into 2½ inch x 2½ squares so let’s get started on the half-square triangles.
- Cut 2 – 2 ½ x 2½ blocks of each tree fabric and 8 – 2½ x 2½ background fabric
- Place the tree fabric right side up and the background fabric right side down on top of it
- Draw a line diagonally across, this will be your stitching line
- Stitch the seam
- Press the seam toward the tree print and trim off the 2 back pieces – this will make one half square triangle block
- Repeat the steps to make one more of each color
Now that you have your half-square triangles (HST’s) we are going to add the rest of the pieces.
I have marked the sizes on the photo below so you can save this to your computer for easy reference. I used a 1/4 inch seam allowance.
Cut the following to complete each tree in the Christmas Tree Runner Tutorial
- Row 1: add 2 – 2½ x 3½ cream rectangles
- Row 2: add 2 – 2½ x 2½ cream squares and add 1 – 2½ x 2½ matching green print square
- Row 3: add 2 – 2½ x 1½ cream squares and add 1 – 2½ x 4½ matching green print rectangle
- Row 4: add 1 – 2½ x 6½ matching green print rectangle
- Row 5: add 2 – 2½ x 4½ cream rectangles and add 1 – 2½ x 2½ brown square for the trunk

I have marked the sizes on the photo so you can save this to your computer for easy reference. I used a 1/4 inch seam.

Here are the tree limbs ready to be sewn into a block.
The completed Christmas tree block is 10½ x 10½ inches square.

Make 3 blocks, I switched the color order on the middle tree.

Cut 2 background cream strips 2½ x 10½ and 4 – 2½ x 2½ squares from the binding fabric – I used a stripe fabric.
Sew the stripe squares to the ends the same way you did the HST’s. Then sew them together. You will need 2 sets of these.
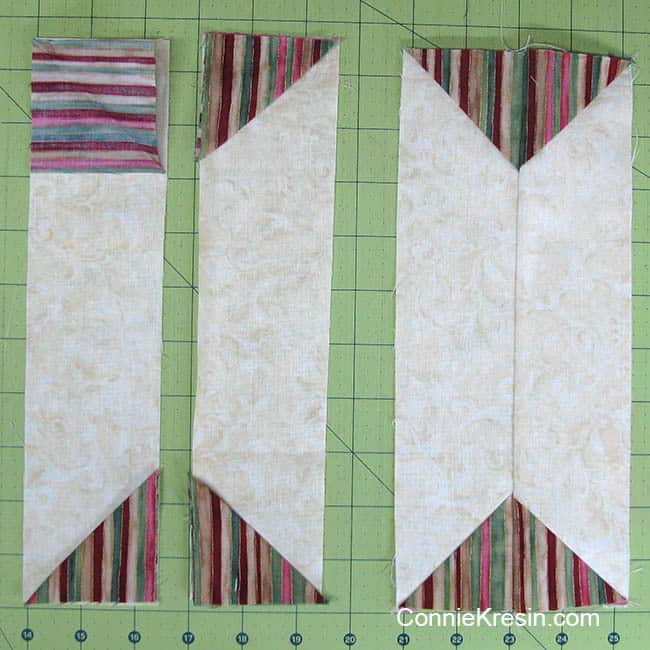
Sew them together as shown below.

Sew the sets to both sides of your center block. Now sew the other trees to the centerpiece.

I used premium muslin for the backing and Warm & Natural batting. I did a simple free-motion stipple quilting on the background.

I cut 3 – 2½-inch x 40″ strips the width of the striped fabric, I really like the way that turned out and used my machine binding tutorial for it.

The runner looks a little funny on my table but that is okay as this is going to my daughter and she has a long buffet in her dining room, I hope she likes it!
I also used my Christmas tree block to make a wider table runner that you might enjoy.

Looking for more Christmas quilt tutorials? Check them out!

Would you like a downloadable PDF?
Great deals for you!
Looking for great buys on fabric and things? Check out these links
- Connecting Threads
- AccuQuilt Deals
- Fat Quarter Shop Daily Deals
- Green Fairy Quilts – Daily Deals
- Missouri Star Quilt Co – Daily Deals
- Scrapbooking
- The Quilt Keeper
- SewingMachinesPlus
- Electric Quilt
- My Amazon Store for all the quilting things I use and more

About Connie
Hi, I’m Connie Kresin Campbell, the quilter, writer, and photographer behind Freemotion By the River. I enjoy inspiring others with my quilt tutorials and patterns. You’ll also see my sweet adopted dogs from time to time.
Be sure and subscribe to my newsletter for more free tutorials and printables.
I started the hsts with 2.5 inches as instructed, but they ended up at only just over 2 inches. It didnt work out for me.
Thank you.
Hi Connie: While taking a break from writing Christmas Cards I am viewing your Wonderful tutorials. If only I sewed?! Maybe one of these days. Love everything you create dear. Merry Christmas to you and yours.
Thank you for all of the emails you post throughout the year. I look forward to receiving them. Merry Christmas to you and your family.
Thanks for the Christmas table runner tutorial. When I cut the 2 1/2 inch squares in half, I lose the tips of the triangles when I sew the other pieces on with 1/4″ seam allowance. Why does this happen? Bonnie Cassar
Is there a way t print the table runner patter without all the ad junk? I would very much like to teach my beginner quilters how to make this.
Why didn’t you just make the green’s longer and add the square at the end with a diagonal stitch and trim? It would be less sewing and looks better. You did that on the dividing sections.
I can’t find where to print out this tutorial?
Love the trees – I might throw a couple of your trucks on there too! One with a tree, one with gifts….your truck pattern is a big hit here. Used it for 3 quilts so far in different colors, for different seasons.
Thanks
Very cute runner. Appreciate your generosity and lovely patterns
This is gorgeous. Would love to see this in a round version for a round table,
What a great idea! This would work if you brought all of the trees closer together in the center.
https://conniekresin.com/christmas-tree-tablerunner-resized/
So sorry!! Decided to make a tree–and discovered that adding a completed strip provides a lovely point!!
As a quilter looking for a gift for a dear friend in this time of avoiding stores, I loved this runner. However–you show an impossibility: if you have a pattern piece divided in half diagonally, you cannot attach another piece to the side with the point without destroying the point! Yet, photos show beautiful points, How did you manage that?
Thank you so much for the great tutorial and such an adorable gift idea!
I love the simplicity of your tutorial and your pattern. This will be a great gift for my married kids for Christmas! Thank you! Carol Kolosso
My first visit to your site and I love it! Thank you so much for sharing your beautiful patterns and finished projects. You have given me the confidence to create something beautiful.
Hi Connie! I like ve thys runner so much. Do you happen to know the yardage needed for this runner? Thank you!
Hi Cassandra, I believe I was using fabrics in my stash and didn’t pay attention to the yardage I used but I’m sure you could use fat quarters of the greens, a half yard or less for the background and one fourth of a yard for the striped binding. Good luck!
I am glad I spotted this on Pinterest, going to make it this week. Thanks!
Hi . . I’m a little late to the party, and just found this tutorial. I love it . . definitely on my to do list. I see mention of a mini table runner, but I can’t seem to find it . . . can you direct me to it ?
Thanks !
Here is the mini tree post and tutorial https://conniekresin.com/2011/12/christmas-tree-mug-rug-tutorial.html
Very cute, Connie!
I love your table runner and your easy to follow tutorial made me believe I could make it for next Christmas. Who knows maybe my friends will find one in their stockings too!
This tree runner is very nice, it adds some more Christmas atmosphere to the house!
Excellent tutorial, Connie!! Thanks sew much!
P
Hello Connie!
That is a wonderful clear tutorial! Thank you so much!
Esther
Gorgeous (as always!) Connie. What a festive and sweet table runner! Hope you don't mind if I share this, with a link back, on my facebook page at http://facebook.com/sewfreshquilts
Thanks, Connie. A real eye catcher. Thanks for the great tutorial. Barb
It,s simple and eye catching! Your tutorial is so clear. Thanks, Connie!
This is great. Going to have to get hot spot so I can show this to my mom she doesn't have internet
I love the tree table runner. I was trying to figure out what I was going to make this year. Now I know. I thank you for the pattern.It is darling.
Connie, I love your creativity and especially this Pine Tree block! I posted your site on my facebook wall. Our church quilters are going to have "Christmas in July" and this is a super block for us! We make lap quilts for Veterans, Child Protective Service, Elder Care & Domestic Violence homes and your ideas will stitch up into lovely, comforting quilts.
This tute is soooo cute too!
I love this. I wish so much I had time to make it. The quilting is absolutely PERFECT.
The runner looks fabulous too!
Thanks for linking to a Round Tuit!
Hope you have a very Merry Christmas!
Jill @ Creating my way to Success
http://www.jembellish.blogspot.com/
I found your tutorial for this beautiful Christmas Tree runner at Madame Samm and I have finished it yesterday evening. I love it and it is laying just in front of me.
Thank you and Happy Christmas to you.
C'est très joli… Merci de nous expliquer comment faire ….
What a cute little table runner.
The tree table runner is just adorable. Thanks for the tutorial.
That a great tutorial and table runner. Very cute.
Great tutorial! Love the pines as we live in the middle of pine trees! I may need to put this one on my list!
Thanks for linking up to the Minutes for Me Linky Party!
Have a great weekend!
still love it
Great tutorial and the runner is really pretty! Thank you for linking up to TGIFF!
Cool table runner, Connie! I like that you used different fabrics for the tree to give it more depth. Thanks for the tutorial — I'll definitely be back to use it, but it may not be for this year. 🙂 Thanks for linking up to TGIFF!
Your table runner looks lovely!
Oh, this is so gorgeous! I have some green batiks that would be just perfect to make one of these too… thanks for sharing your tutorial!
Hi, Connie, the Christmas tree runner is beautiful. And thank you for doing a tutorial on it.
Merry Christmas
Fabulous idea for the pine tree runner. It is so nice of you to share it as a tutorial.
This table runner is so adorable!!! I love it!!! Thanks so much for the fabulous tutorial. I need to get one of those rulers for the HST 🙂 That would save me some serious time 🙂 Thanks for linking up 🙂
The table runner is adorable! Thanks for the wonderful tutorial 🙂
The table runner is so cute – I really like the fabric you used for the trees.
Connie, your tutorial is wonderful! You are a definite pro with your explanations and pictures…a gorgeous table runner and love the mug rug as well!