
Swirly Pinwheel Tutorial
This post may contain affiliate links which won’t change your price but will share a commission.Many times you need a special ruler or template for a quilt block, this Swirly Pinwheel Tutorial is done using a piece of cardboard for the template.

This is actually the way blocks were made years ago. I also added a small appliqued flower to the center of my mini wall hanging using a Sizzix die.
Swirly Pinwheel Tutorial
12″ x 12″
When I took part in the Think Christmas blog hop, I showed you this little 12-inch wall hanging that is hanging from an Ackfeld wire quilt frame and today I’ll give you a Swirly Pinwheel tutorial of how I made the blocks.

Start out with a charm pack of your favorite quilt fabric. I used a charm pack of Jovial by BasicGrey for Moda. The cardboard backing from any charm pack is perfect to make a template out of.
Just mark a 2½” x 2½” square and cut it out using old scissors or an old blade on your rotary cutter. I have several and I have marked “old” on one rotary cutter and use that for paper and batting.

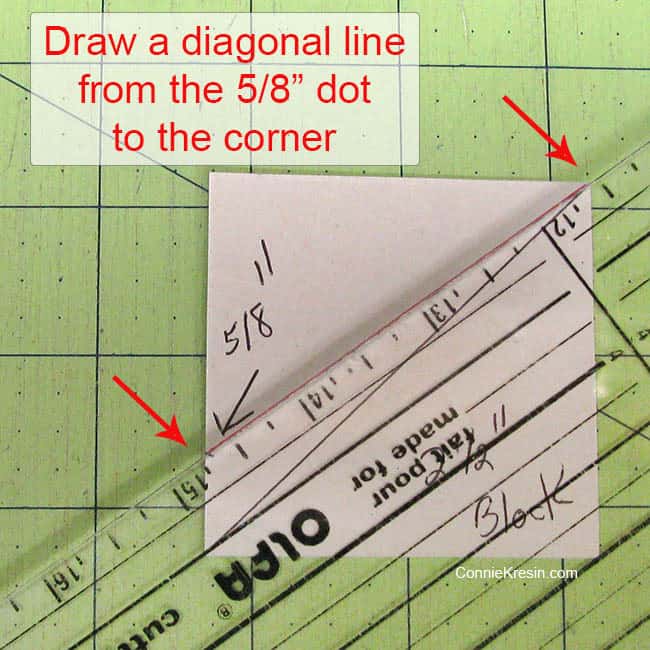
Mark a line diagonally across the template. Next, mark a dot 5/8 inch up from the bottom corner on the left side.

Use a ruler to draw a straight line from this dot to the upper right corner.
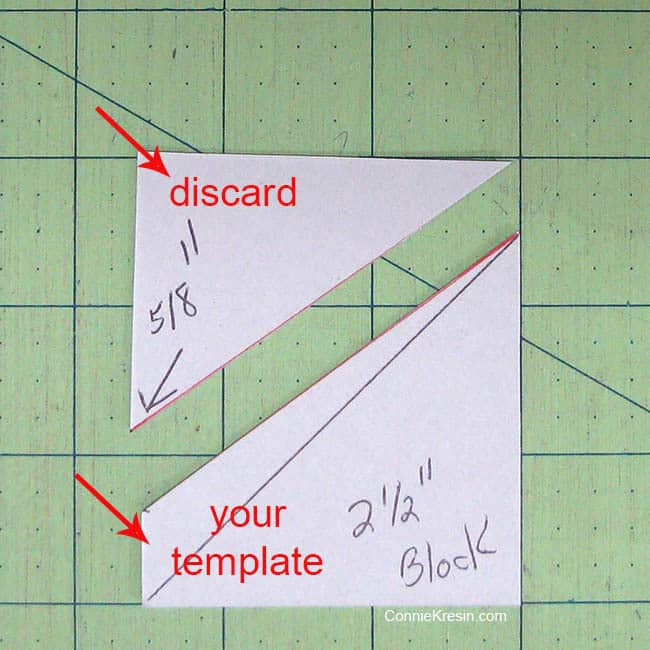
This photo shows what you have just drawn, cut on that line.

Cut on that line and discard the top section. You now have your template for the quilt blocks.
Cut your 5-inch charm squares into four – 2 1/2-inch squares.
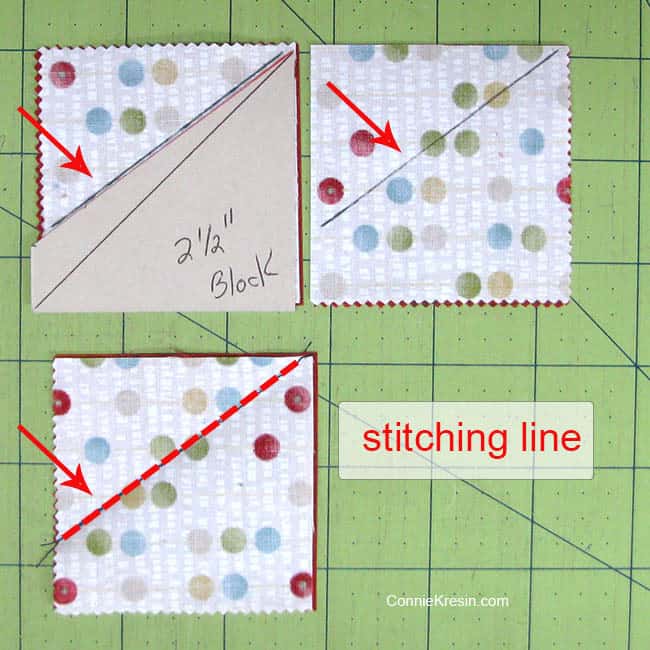
Then place one white square on each red square with right sides facing each other (always place the white fabric on top).

For this tutorial, I am just using 2 colors of fabric. Note: you could always use scraps from your stash too, just make sure you always put the background fabric on top.
Follow the diagram, lay your template on top of the square, mark a line and then stitch on the line.
Press your block and trim. Be sure and press all of the blocks with the white (background fabric) to the top.
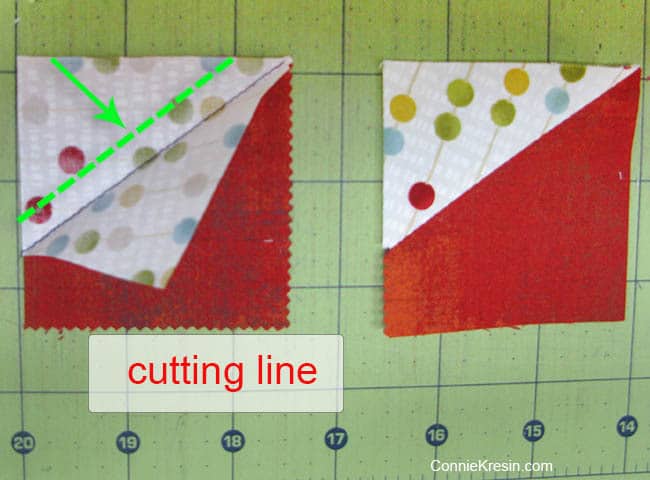
Now lift the top white layer, turn to the wrong side and trim the two bottom layers. You now have one section of the block.
Cut off the corner – trim about ¼ inch from the stitched line as shown in the following diagram.

Layout the blocks – sewing four sections together as shown. You could also use different fabrics as I did in the wall hanging and mix the sections.

Always press so your Pinwheel fabric is on the bottom and your Background fabric gets pressed away from it.

Depending on how you sew your blocks together, you can get a completely different look. This is also why it is important to have all of the blocks pressed in the same direction. Look at the example below.
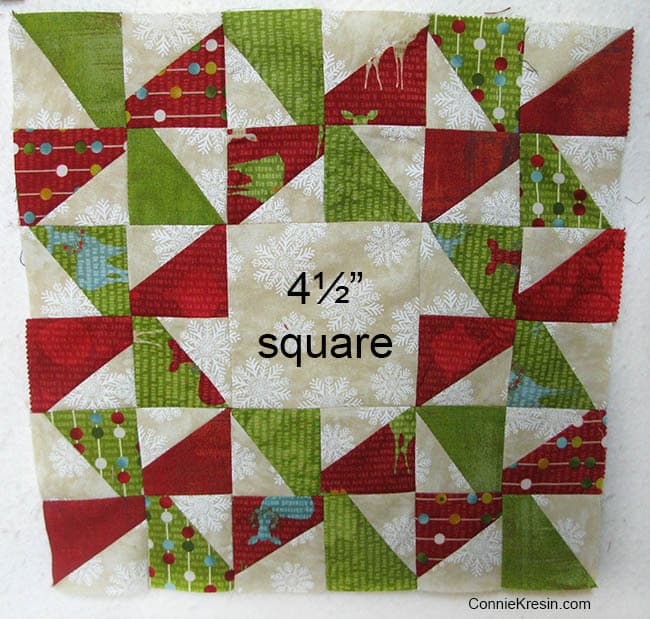
The mini Swirly Pinwheel quilt is made from eight pinwheel blocks and an additional 4½” square is added to the center of the block. I used a fat quarter of a cream fabric cut into 2½” squares for all of the light-colored squares.
If you would like to add an applique to the center, you could use any applique flower template you have or download the one I have provided. The Sizzix die I used is called Tattered Florals by Tim Holtz but I believe that die is now retired. You can find other Sizzix floral dies.

I have included a flower template that you can use in the center of your Swirly Pinwheel wall hanging. I did a free-motion wiggle stitch around my applique flower, you can do any type of applique you like.

I then quilted my wall hanging and used 2 strips of 2 1/2-inch fabric for the binding.

Download a pdf of this tutorial, get the free flower template, and sign up for my newsletter and free resource library.
I hope you enjoyed this tutorial and I can see all kinds of different possibilities for this block. This block size is 12 inches, I forgot to mention that. Do you like tutorials with lots of photos?
MORE POSTS YOU MIGHT LIKE:
- River Whirls tutorial – like this tutorial but larger
- Christmas Mug Rug tutorial
- Scrappy Butterfly Baby Quilt tutorial
- Makeup Tote tutorial
Swirly Pinwheel Tutorial is fun and easy to make!
Great deals for you!
Looking for great buys on fabric and things? Check out these links
- Connecting Threads
- AccuQuilt Deals
- Fat Quarter Shop Daily Deals
- Green Fairy Quilts – Daily Deals
- Missouri Star Quilt Co – Daily Deals
- Scrapbooking
- The Quilt Keeper
- SewingMachinesPlus
- Electric Quilt
- My Amazon Store for all the quilting things I use and more


About Connie
Hi, I’m Connie Kresin Campbell, the quilter, writer, and photographer behind Freemotion By the River. I enjoy inspiring others with my quilt tutorials and patterns. You’ll also see my sweet adopted dogs from time to time.
Be sure and subscribe to my newsletter for more free tutorials and printables.
super tutorial! I do like all your photos. sometimes a picture is like a little lightswitch to start my understanding. thank you!
Dropping by from the Sew Darn Crafty link party.
What a pretty block! Thanks for sharing and yes, I like lots of photos in tutorials.
Love the pinwheel!! And, yes, I really like it when tuts have lots of pics! Thank you!
great tute! yes, i like lots of pix … easier to work from.
LOVE YOUR TUTORIAL! GREAT BLOCKS>NOW I WANT TO DO SOME PINWHEELS TOO! THANKS FOR SHARING!
msstitcher1948@yahoo.com
Thanks for sharing the tutorial! Another added to the to do list!
I LOVE tutorials with lots of pictures. Thanks for sharing your "insider secrets" with us. Congrats on being chosen as one of the "Blocks of the Day!"
Thanks for the great tut!
Thanks for the great tut!
This is lovely. Thanks for the great tutorial
quilting dash lady at comcast dot net
Oh, meant to say, Yes I do like tutorials with lots of photots 😉 Thank you again, Elly
Super tutorial Connie 🙂 Thank you for taking the time to share with us all 🙂 Elly
Great tutorial and I like lots of pictures. Thank you.
Oh I forgot to mention I do like the pictures they are very helpful.
Thank you so much for the promised tutorial. This is definitely something that I would love to make.
This is so cute!!! This is going on my bucket list for sure! Your tutorial was really well written and I LOVE pictures! 🙂
Thanks for the tutorial
Awesome tutorial Connie! Thank you and yes, pictures definitely help me to understand a tutorial easier. You've done a fabulous job with this one.
Thanks so much Connie, What a nice tutorial. Will try it! Thanks for including the flower. I don't have one of those fancy cutters. You are the best!
Great tutorial Connie, will put it on my ever growing "to do" list.
Thanks!!
Way cute Connie. Great tutorial. Thank you. I definitely want to give this a try.
SewCalGal
http://www.sewcal.blogspot.com
Your tutorials are just so great!!! Thanks for linking up 🙂
Thank you so much for the tutorial!! I love tutorials with lots of pictures – especially those that show me the wrong way as well as the right way! Awesome!!! Bookmarking this page for easy reference!!!!
love this! I am wondering the finished size too.
This was worth the wait, thank you for this tutorial. =)
Connie — thanks for the great tutorial !
Just love the wall hanging. What does it finish out to ? Size wise ?
Thanks again !
Karen
What a fun pattern! I'm going to pin this!
Very cute. I think I have a charm pack that I can try this with. THanks for the tutorial.
Great tutorial! I going to try this block. It looks like fun.
Wonderful post!! Love this and thanks for the tutorial!
It looks so good. Thanks for the great tutorial.
Thanks for showing us how to make your block.
wow great tut I am going to have to give this a try!
great tutorial! I love how you turned the charm pack cardboard into a template – talk about making the most of EVERYTHING! Love it!
Great tutorial…excellent pictures and instructions!
Great tutorial Connie…and, yes, love lots of photos with tutorials! I have that Tim Holtz die…what a fun way to use it!!! TFS
Great tutorial Connie and a great block .Thanks !
Thanks so much for sharing your great tutorial and design!!